
[Copyright 2007-2021 by David Morton, image courtesy Panasonic Corp.]
Remove the platter
Why, oh why didn’t the good folks at Technics include dust cover hinges with their product? It’s not like the hinges are in the way if you decide not to use the dustcover. But if you’re like me and you bought an SL-1200mk5 to use at home, you will definitely want to use that cover. Taking it completely off every time you want to play an LP can be a pain. But there’s no use whining about it. You can order a pair of hinges, plus the necessary hardware, from DJProAudio.com [2021- looks like they are no more] or any number of other places. The first step is to remove the platter by carefully pulling it straight up. There is nothing holding it on but gravity, but sometimes the platter seems like it does not want to come off. You can pull firmly, but if you don’t pull straight up you are liable to damage the motor.
Now, prep your turntable for disassembly and remove the base.
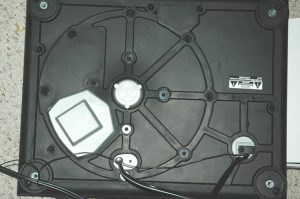 If you look at the back of your SL-1200 or SL-1210, you’ll see two black, metal plates that look like they have something to do with the hinges. Don’t be fooled. These are just blanking plates and they have to be removed. And believe it or not, the turntable has to be nearly disassembled to remove them! This will require working on the bottom of the turntable, so it needs to be carefully prepared. Remove your headshell and cartridge and clamp the tonearm into its rest. Find a small cardboard box or a couple of books to put under the tonearm side of the turntable, to keep the weight off the tonearm itself with the turntable is upside-down. Flip the turntable over and put it on a carpet or a towel to avoid scratching the paint. Now remove the four feet and all the black screws from the underside. When you’ve got all of them out, you can “peel” the soft rubber base off the chassis.
Remove the “ballast”
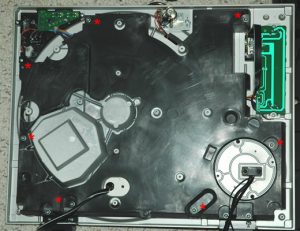 That big gray block of plastic is apparently just dead weight.I suppose it’s intended to add mass to the turntable, which undoubtedly cuts down on vibration and shock being picked up by the cartridge. Remove the silver colored screws (indicated in red in the photo) and this chunk of plastic will fall off.
Those blankety blank plates
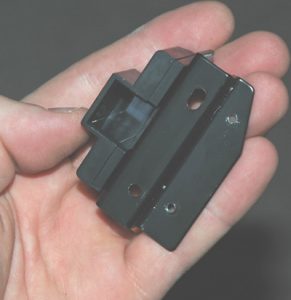
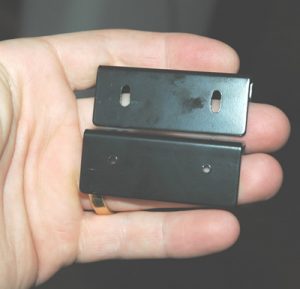 You now have unobstructed access to the blanking plates. The photo shows a blanking plate compared to one of the pieces that came in your hinge kit. Hmmm. They appear so similar, don’t they. The only difference is that the holes in the hinge plate (top in the photo) are bigger than the ones in the blanking plate. At this point, you should begin to become suspicious about the motivations of the Technics engineers who decided to install the blanking plate rather than the regular hinge plate. Could it be that they did this in order to try to extract a few more dollars out of their customers after the sale, when the turntable was returned to an “authorized service facility” for an expensive hinge installation procedure? Perhaps. I don’t want to give away any secrets yet, but we’ll see these blanking plates are the key to a big shortcut in our hinge installation. But for now let’s stick to the factory approved plan.
 The SL-1200Mk5 Hinge Kit
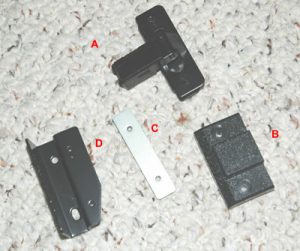
This is what you get when you order a hinge kit. Well, actually, if you order the whole kit from DJProAudio, you get two of everything you see here, plus a bunch of screws, washers, and lock washers. The hinge itself consists of one part that attaches to the dustcover (A in the photo), a hinge plate (D), a hinge socket (B) and the silver mounting pad (C)
The Lower Hinge.
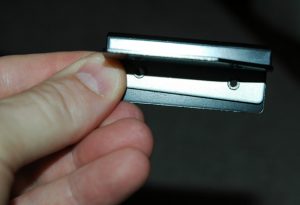
Put a lock washer and washer on each of the four black machine screws. Insert a machine screw/washer assembly through one of the holes in the hinge socket, through the corresponding hole in the hinge plate and into the threaded hole in the mounting pad. Don’t fully tighten the screws now, as you’ll be doing some adjusting later.
The photo above right shows the correct placement on the mounting pad on the back of the hinge plate. The photo at left shows an assembled hinge. Note the relationship of the socket opening to the hinge plate. It is easy to assemble these “upside down,” so be careful here.
Install the Lower Hinges First
Each plate is held on with two screws. I found it easiest to install the lower hinge onto the “ballast” block. There were four sheet metal screws included with the kit from DJProAudio, and I think they were intended to be used here, but they seemed a little short. I used the original screws instead and they worked great. Don’t fully tighten these screws yet.
“Reassembly is the reverse of disassembly.”
That’s what it always said in the insanely complex section of the GM factory repair manuals in the “automatic transmission” section, and it was never, ever true. But in this case you can trust me. Replace the gray plastic “ballast” piece, making sure that the hinges fit down onto their locating pins. One the ballast it tightened, tighten up the hinge screws. At this point, check carefully and make sure that you assembled and installed the hinges correctly. Is the hole in the socket facing “up” toward the turntable platter? Are the two large holes in the hinge plate resting on the locating pins on the turntable chassis? If not, disassemble the hinge and try again.
You’re almost there. The hard part is over
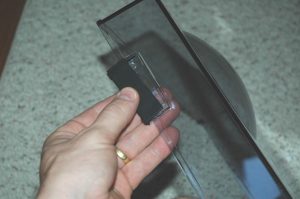
Hopefully everything is completed on the lower hinge. Reinstall the feet, flip the turntable over, and carefully replace the platter. Now get your dust cover and remove the black rubber blanking plugs. They are lightly glued in place but will come off if you pull straight town, toward the edge of the cover.

Attach the upper hinges
Remove the screws from each upper hinge and press the hinge onto the dust cover. The hinge may not seem like it wants to cooperate, but it will go on there if you push hard enough. When you get it on, insert the screws and tighten
Install the Dust Cover
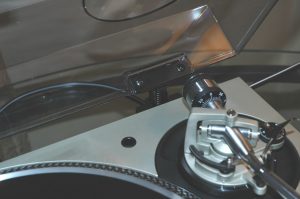
Install the dust cover by inserting the top hinge into the hinge socket. At this point, you can tighten the remaining hinge screws (see step 6). You’re done. Now you can reconnect your power, audio, and ground cables, open up a bottle of your favorite beverage, and enjoy an LP record, dust-free. As you gaze upon your now-improved SL-1200, ponder the following question: why the hell didn’t Technics install these hinges for you at the factory? It is not for us to know, but the assembly process suggests a much quicker alternative that might work just as well.
You are done!
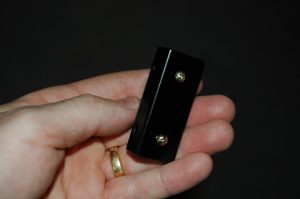
Remember those blanking plates? The ones that look almost just like the hinge plates? It would probably be much, much easier just to drill those holes out a bit and install the hinge socket directly to the blanking plates. That would eliminate all that disassembly and reassembly. In fact, those extra screws that DJProAudio sent me seem to be suited to that very purpose. The photo [2021-back then I was married lol] shows the old blanking plate with the mystery screws installed. For an ever better installation, you could drill out the holes a little and use a tap to cut threads for machine-screws. There’s no danger of drilling into anything important on the inside of the case, so there’s no real reason to remove the blanking plates. And if the screws did not prove strong enough to stand up to the use of the dust cover, you could always go back and use the hinge plate and mounting pad like the factory recommends.